
iPhone App Development - Quiz Exercise
What is it?
Swift is the current language for creating iPhone applications. It works within Apple's Interactive Development Environment (IDE) XCode. It is a combination of visual and programming interfaces.
Why should I learn it?
The world is mobile. While many content applications can function on phone browsers, there are some applications, like games, social media and ecommerce, that need native functionality.
What can I do with it?
You can create the visual interface as well as add code to represent functionality of your application using Swift and XCode. Then you can test and upload to Apple's App Store.
How long will it take?
Learning application development is a different and bit more difficult than creating websites. These tutorials will take several weeks to go through to explain the basic functionality available for application development. But with time and practice, you can master the skills necessary to create functional applications. Beyond iPhone development, there is native Android development and cross-platform options like React Native to consider.
Quiz Project
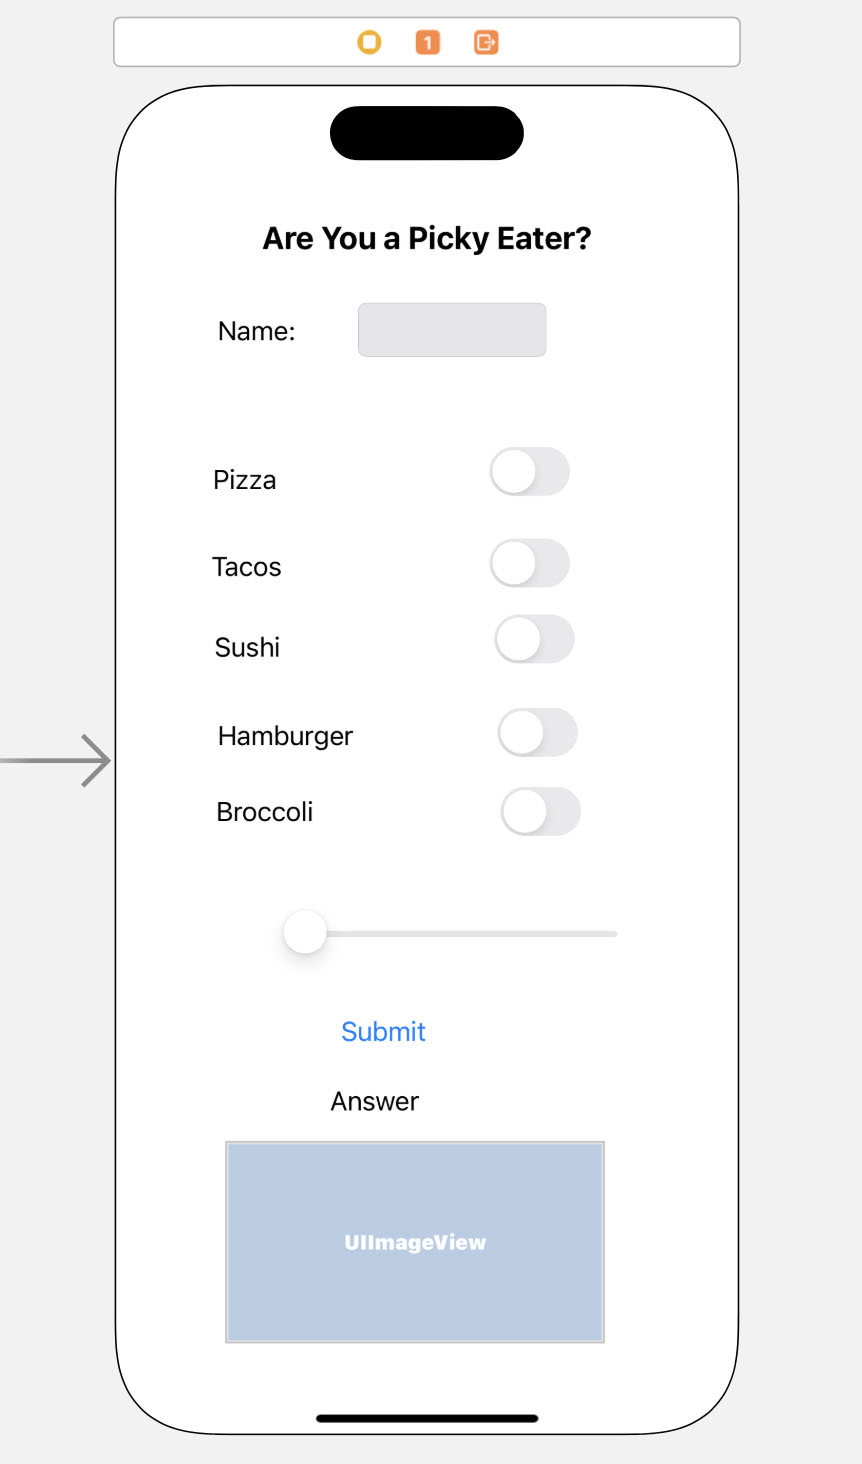
Our next exercise will be a simple quiz. We’ll ask about foods they like to eat to see if the person is a picky eater. We will have a list of food items and ask the person to select yes or no with a switch. Depending on how many he or she selects, we will determine if he/she is a picky eater, an average eater or an adventurous eater.
Start a new XCode Project called EaterQuiz. iOS App.
On the Storyboard, add labels, textfield, imageview, switches and slider to make the interface look like the image to the right. Add as many food items as you want, but try to have at least five. Have the switches start off as Off.
Add a label for the title and one for the answer. Add a button to be able to use to Submit.
Text Field
Drag from the TextField to the ViewController and make an Outlet named myName. This will hold the result of what is input into this TextField. We will ultimately use this in a message to the user. Tip: One of the attributes you might want to change for a TextField is the Correction attribute. For names, you don't necessarily want it to auto-correct, so you can change the Correction to No.
Establish Variables
So far, we haven’t done any coding. We’ve just set up our interface. We need to set up a method for each switch to give a value to each item. Let’s first set up variables that initialize all to 0.
I used these five foods, but you can use any five foods you want. We will modify these variable depending on how the user answers. I also initialized a variable for the name and total.
Place these at the top of the ViewController. If you need to open the ViewController, hold option while selecting it in the Project Navigator. We are initializing these variables here at the top of the ViewController, so they will be accessible throughout the program and not just in their respective functions.
Add Switch Code
For each switch, drag into the interface to create the function algorithms. It’s an Action. Give them each a name (like selectPizza) and choose UISwitch as the Type.
Make sure the initial state of each switch is "Off".
The code to use for each switch is to the right, except each uses a unique name and gives one to each variable, if it is "On".
You should also include an else statement to indicate that it goes back to 0, in case the user changes a response.
Do this for each switch. Then we will add up the values and display (temporarily) in the Total label.
Add Button Code
We also need to ctrl-click and drag the button into the code and establish it as an Action. Call it submit.
Make a Total Label (Outlet) that you connect to the code as myTotal.Use the code to the right in the button function. It will calculate the total and place it in the Total label. Run the app to test.
Add Comments to Response
So, that tells the person how many she liked. But we really want to provide a comment. Replace the line of code that puts the total in the function with the series of if statements to the right. Notice how we set the "name" variable and concatenated it in the response.
We used a range for the else if, to indicate numbers between 2-4. Feel free to modify these numbers or to establish different values for when the user selects (maybe you get 2 points if you like sushi…?)
Add an Image
In addition to the statement that reflects their answer, you might want to also add an image, a meme or gif, to accompany the answer.
Find images that you want to include in the app and drag them to the Assets folder. You should make sure the images (use Photoshop) are the same dimension, so they show properly in the app. If you just want to try three images, I have some at mobile.cindyroyal.net/images.
Find an ImageView in the Library and drag it to the Storyboard.
Now click and drag from that ImageView into the code. Make it an Outlet and name it myImage.
Then in the code for each of the states of the ifstatement, include the following, changing out the name of the image. You don’t need to include the extension (.jpg, .gif), etc.
If you initially leave the ImageView blank, nothing will show until an action adds the image. You can also hide the ImageView with the attributes inspector and use myImage.isHidden method, if you need to execute show/hide functions.
Using a Slider
Maybe you have a question that has more than a yes/no or two potential answers. You can use a slider to introduce more options, grab the value and then use it in your code to make determinations. We’ll ask the user, on a scale of 1-5, to rate how he/she likes sushi. Then we’ll add that amount of points as a sushi bonus to the total.
Let’s add a Slider that asks to rate their love of sushi.
Drag a slider to the Storyboard. In the Attributes Inspector, set up the min, max and default value (0, 5, 0 in this case).
Put some labels over the top that indicate the numbers. Also include a label above with the question: How would you rate sushi?
Drag from the Slider into the code. Name it myRating and make it an Action and Type UISlider, because we want to grab the sender.value from it. We will be grabbing the values depending on what the user chooses and then making that value the sushi bonus. Note: The video doesn't have a label that indicates this is a sushi bonus slider, but any text should be added so the user knows how to use the slider!
We initialized a variable for the sushibonus at the top with the others, so that we can use it throughout the app. Double-check to make sure it is there in your list of variables.
This will get the value from the slider and put it in sushibonus.
Complete the App
Then all you have to do is add the sushibonus variable to your total calculation in the Submit button. The code to the right is the complete function for the button.
As your calculations get more complicated, you will probably want to set up a temporary label to hold the total while you test to see what happens at the break points for state of the ifstatement.
Note: In the case of this app, we probably would want to include a message if the user didn’t pick sushi in the list, but did indicate that it had a high rating. There are many error corrections and validations that need to be done on an application when you begin testing. Consider how you would solve this problem. (Think about a statement that says “Did you forget to pick sushi?” if the sushi rating is 3 or more.)
One final thing that should be done is to resign the keyboard after the user fills in their name. When the user is on an app, the keyboard comes up. It doesn't go away automatically. We, of course, can use the cmd-K shortcut to toggle the keyboard. But a user on the app doesn't do that. To handle that issue, Add a button next to the name to Enter Name. Then below, we can add a Label as an Outlet named myGreeting (Ctrl-drag to make the Oulet). Ctrl-drag to the interface for your Button, call it submitName. See the code to the right that gets the name from the myName textField, puts it in a variable (name), changes the myGreeting text and applies the resignFirstResponder() to the myName field, so the keyboard goes away.
Moving On
That’s it. You’ve created a simple quiz that lets users determine if they are picky eaters. This demonstrated our use of Labels (that can be used as Outlets), Switches, Sliders, Buttons and using if statements to display an answer. It also demonstrated how to programmatically change an ImageView. Of course you could do much more to add logic or different types of calculations to make this more interesting, so be creative. But you now have many options for creating your own application.