
HTML
What is it?
HyperText Markup Language. It's the language of the Web. It provides the structure of the content on a Web page. You will use elements or tags to "mark up" text on the page, so the browser knows how to display it. CSS (Cascading Stylesheets) provides consistent design techniques and JavaScript can add interactivity. But HTML is where it all begins.
Why should I learn it?
Knowing a little HTML can go a long way. Even if you aren't going to be coding websites by hand, you might need to tweak something in a content management system, like Wordpress, or resolve a simple coding issue in a project site you are managing. Plus, if you are going to learn programming, this is a good place to start.
What can I do with it?
You can start to make Web pages with HTML. You will learn the basic elements and their associated attributes. But your pages won't look that great. That's ok. We'll move into design with CSS next.
How long will it take?
If you buckle down, you could do this tutorial in a few hours. There are eight videos that clock in under an hour. But take your time. You'll want to follow along with the code on your own and spend some time modifying it until you understand all the elements and attributes.
Getting Started
HTML (HyperText Markup Language) files are text files that include tags that indicate the structure of a Web page. A Web browser reads the HTML file and interprets the elements, thus presenting the information in the way the Web designer intended.
An HTML file can be developed in a simple text editor like TextEdit (as long as you turn off the Rich Text properties). But it is best to use an HTML editor like Visual Studio Code (VS Code), Atom, Sublime Text or NotePad++. I currently use VS Code, but feel free to use any html editor for your preferred platform - Mac or PC - with which you are comfortable; each has different features that can be helpful in troubleshooting. But all work in most the same way.
Visual Studio Code Tips: There are a couple settings that will help you get started with Visual Studio Code. First, turn off auto-save. You can do this under the File menu, making sure Auto-Save is not checked. You can also use Search, Preferences, Settings and search for Auto-Save and make sure that setting is turned off. Also under Settings, you can search for "wordwrap" and make sure the setting that "controls how lines should wrap" is turned on. That way you can see all your code wrapping in the VS Code window. You can also choose Word Wrap under the View menu, but you will need to do every time you enter a file. If you are using a different html editor, you should be able to adjust the settings for these options, as well.
The process you should use is to have both your html editor and a browser opn at the same time. You start a new file in the editor, begin coding and then save. You simply save the file with the .html extension. You can then open the file in a browser (File, Open File or cmd-O on Mac. Or ctrl-O on Windows computer), like Chrome, to see what it looks like. Then you can refresh the page each time you make a change in the HTML.
Programs like Dreamweaver also create HTML, but it's good to learn how to hand-code from the start, so you can modify existing code or customize a template.
Used in conjunction with stylesheets, HTML separates document structure from formatting, thus allowing more flexibility in Web design.
An element (or tag) is a command written between angle brackets (the less-than and greater-than symbols).
Some elements have attributes that provide a variety of options. The attributes have associated values deemed by the designer.
Values are surrounded by quotation marks. If you happen to be copying html from another document, always be sure you aren't copying rich text quotation marks or apostrophes. They will not render correctly in the browser and are likely to cause problems in the code.
Most tags must also be closed after inserting the contained text.
This element bolded the text "Cindy's Page". The closing tag makes sure the rest of the text is not bolded in the document.
In HTML, elements could be written with uppercase or lowercase text and it made no difference to most major browsers. However, in XHTML, lower-cased tags were required, but code still renders regardless. It is considered consistent coding style to use lowercase for html elements in HTML5 and is the standard that most Web developers now use.
Another standard introduced by XHTML was the requirement that all elements must be closed. In most cases, you close the element after the text that you are marking up, as in the use of
Basic Elements
Basic Elements
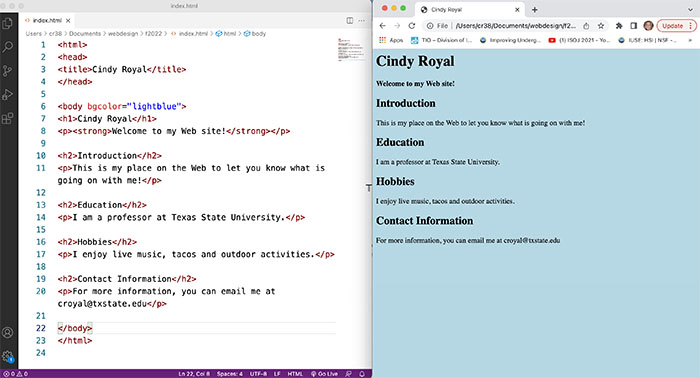
<html> - the opening tag on every html page. It tells the browser that this is an html file.<head> - indicates the head section of the document. Nothing within the head tag actually shows up on page, but this is where designers can store information about the title or special search terms associated with the page.<title> - indicates the title of the page. This title does not show up on the page itself, but in the top title bar or tab of the browser. The title should reside in the head section of the document.<body> - indicates the beginning of the section with content in it. There should be no content between the<head> or<body> sections of the page. The attribute bgcolor can be used within the body tag to change the background color of the page. You can use the six-character hexidecimal code (see the websites that provide HTML Color Codes) or you can use a limited number of words to describe color, i.e. red, blue, lightblue, orange, etc.
<body bgcolor="#AA11CC"> or <body bgcolor="red"> <strong> replaced<b> to create bold text;<em> replaced<i> to create italic text;<h1> ,<h2> ,<h3> …<h6> etc. – indicates a level of heading size. Use headings as you would an outline, giving the smallest number to the item of the top importance and so on. You will control the size and typeface later in CSS.<p> - indicates the opening of a paragraph; puts space between it and the previous content creating a new block of text.<br /> - provides a line break without the spacing of a paragraph; use the closing slash within the element to close it. This is an example of a standalone tag, because there is no text being surrounded by it, nothing to "mark up."
Format of an HTML file
Copy and paste all the code in the Code Sample to the right into a text editor like Visual Studio Code or Atom.
Note: All html files should be saved with .html extension. For the homepage of your site, name it index.html. This is the default filename for the home page when it is on the Web. When you upload the file to the Web, the user simply has to type the domain name into the browser to get to the home page of your site. Other pages on your site can be named anything you want, with the .html extension. For consistency and easy troubleshooting, filenames should be lowercase with no spaces.
Save the file you are working as index.html. It is a good idea to start with a new folder on your computer when you save the file. Open index.html in a browser (File, Open File). You should see the file render with the title, background color and heading and paragraph formats. Notice the structure of the page, the opening html element, the head and body sections, the use of the bgcolor attribute and the way that all elements are closed around the content it modifies.
Play with some additional headings, like h3, h4, to see how they work and change the bgcolor value. Feel free to add or change content to make the page your own!
Code Sample - Basic Elements
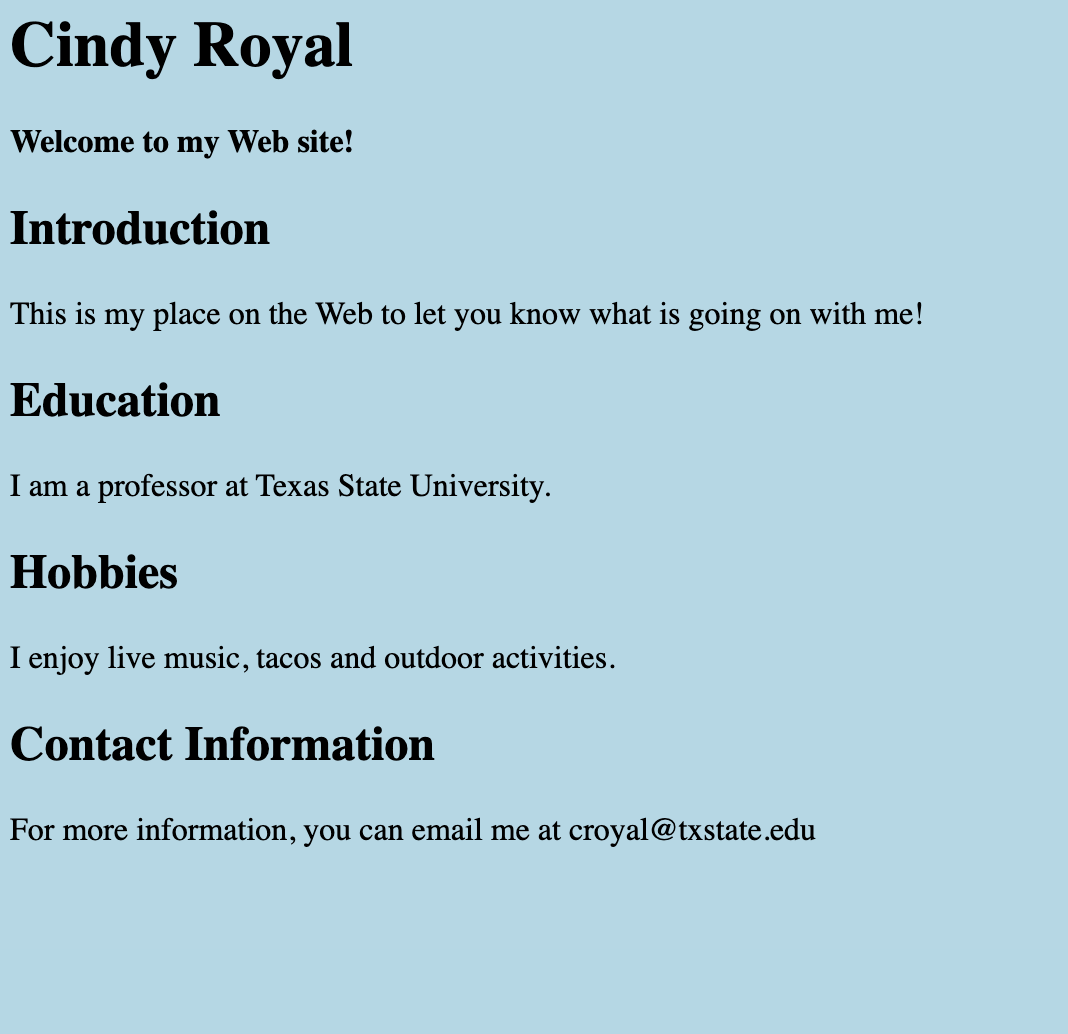
Your page should look something like this when you open it in a browser. Don't worry that it's not that elaborate yet. Next you'll learn to add images, links, lists and tables, and in the next lesson you'll learn to apply styles with CSS.
Inserting Images
Images add visual interest to your pages. You have to have a digital image. Web browsers can read .jpg, .gif and png files. You can use images from a digital camera, create your own images in a graphic design program, scan photos or images or use images from other Web sites (but not copyrighted images). Images can be still or animated. This site doesn't cover graphic software packages, but there are many good tutorials across the Web on using Photoshop and Illustrator.
Once you have an image that you want to insert, the tag is as follows:
This will insert an image into the file named “imagename.jpg” that exists in the same folder as the page you are working on. If the image is in or will be in a different folder than the page, the folder path will have to be included in the file reference.
Notice the use of the closing slash. The img element is another standalone element, because it does not wrap around content to mark it up. It is simply a reference to a file.
IMG attributes
- src - file source of image
- border= "n", where n is the size in pixels of desired border
- alt="text", where text is alternative text that shows when image is not available or when someone is using a text reader (as in visually challenged); alt tags are very important for accessibility standards
- width="x", height="y" – where x and y are specific dimensions of the file. Be careful with this. If you do not use the proper proportions, your image will be distorted on the Web.
- align="left" or align="right" – used to wrap text around an image
Many of the attributes above will be replaced with CSS for further styling.
Using a Background Image
Use the background attribute of the body element to use a background image for an entire page. If it is located in a different directory, then the directory path must be specified.
Small background images will be tiled to fit the screen.
You can make your own background images (in Photoshop, etc.) or you can find images to use as backgrounds all over the Web. To save an image from the Web, simply hold down the right click or ctrl-click on the image or background and use the Save command. But, you should never use images on your Web site that you do not have permission to use. In general, images you use on your a web page should be less than 300kb in terms of file size.
In the early days of the Web, designers used colorful backgrounds on their pages. As the novelty has worn off, most designers prefer to use black text on white backgrounds (easier to read). They use images and other elements to add color to the page. We'll be working with various methods for using background images in smaller sections of pages and developing interesting layouts with CSS.
Code Sample - Images
Modify the code from the file you started above and continue to save it as index.html. When you are typing, open and close tags as you go, rather than simply copying the code or typing the file in a linear manner from top to bottom. This will allow you to understand the things you are marking up.
Refresh the file in the browser. Refresh the page every time you make a change.
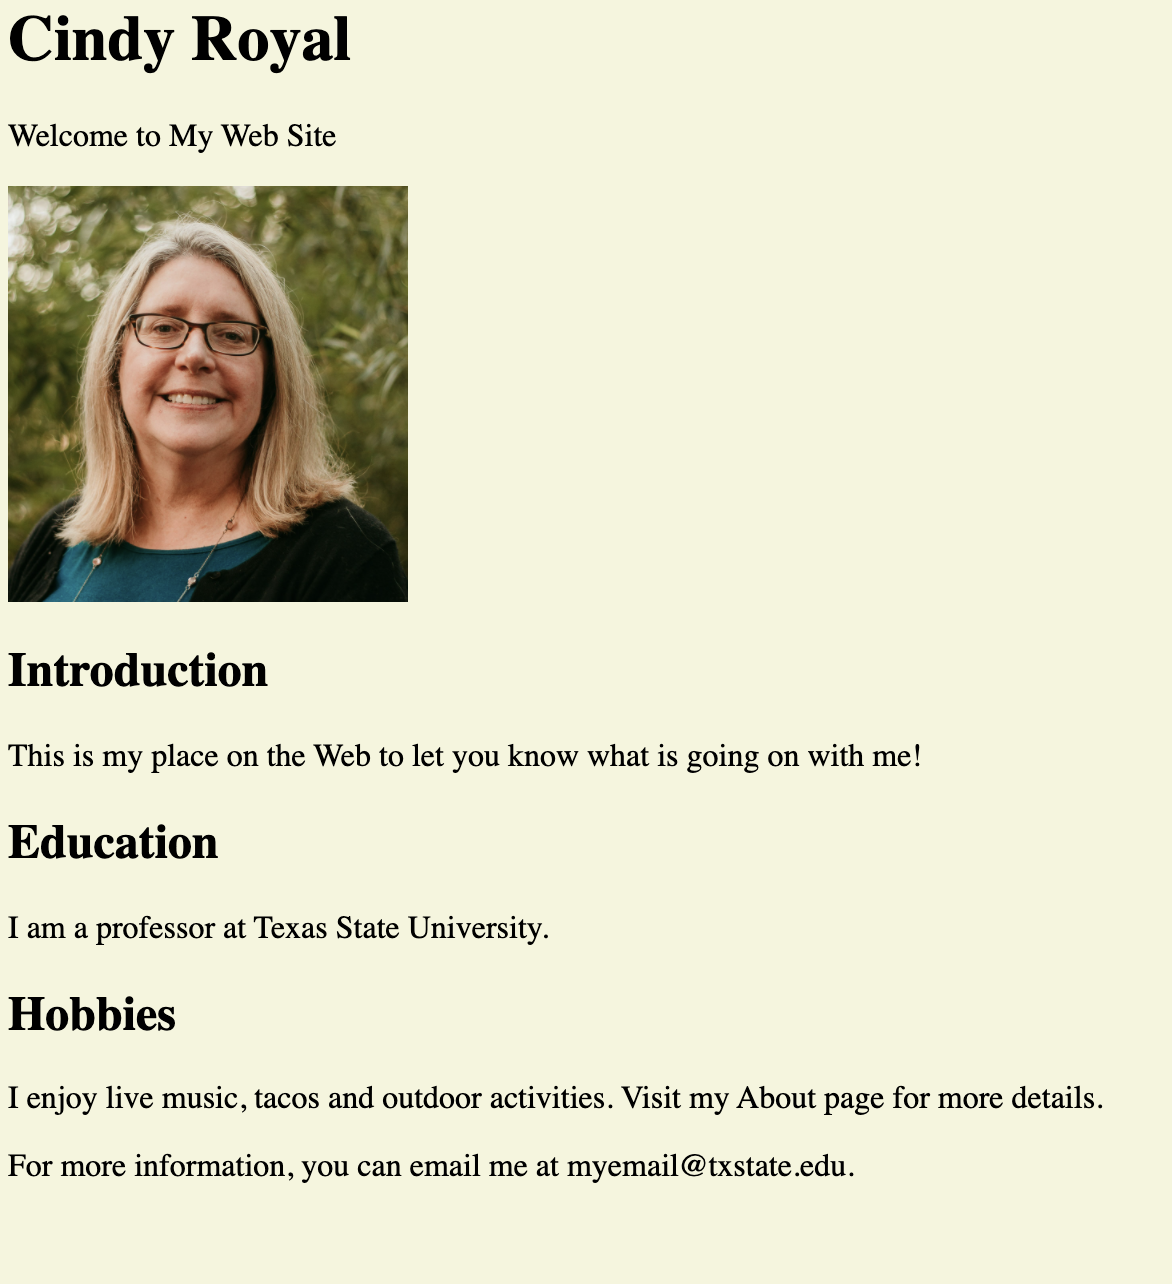
Your page should now look something like this. You should see your image rendering. Use the width attribute to adjust your image size, if it is too large, but don't try to make it larger than the original quality. That will create pixelation and your image will appear blurry.
Inserting Links
Links are what put the "hyper" in hypertext. They are the most unique feature of the Web that can't easily be replicated in print or broadcast. Links allow the user to be whisked to another part of the Web for more information, to another page on the same site or to somewhere else on the web.
Use theLinks to external sites:
This should always be an absolute link reference, meaning the specific location is used as the attribute value. You must include the http:// in front of the url to make an external link. It's a good idea to have your external links consistently open in a new window.
Links to other pages on your Web site:
This is considered a relative link reference, because it refers to the location of the file as it relates to the current file. The same link on someone else’s page would not bring them to your page. You use internal links to create navigation for your website.
You can also include directory structure in the link reference, if the file is not in the same directory as the page with the link. For example, if the page you are working on is in your main directory and the file you are linking to is in a directory called "assignment1" that is below your main directory, then the tag would look like:
Remember, use absolute references for links to other sites and relative references for links in your own site.
Using an image as an icon for a link
This inserts a picture as the icon for the link. You can use this feature to use your own icons for links.
Creating a mailto: link
Mailto links aren't as popular as they once were, as people now use Web-based email services like Gmail, but you still sometimes see them on Web pages. If you plan to use one, make sure you include the email address as the link text so it can be easily copied and pasted into a Web-based mail program.
One more thing about links:
To change the color of text links, use the following attributes in the body tag:
- text-establishes the color of text on the page (non-link text)
- link-establishes the color of links before visited
- vlink-establishes the color of link after visited.
Hover state can be controlled with a stylesheet. We’ll cover in CSS.
Code Sample - Links
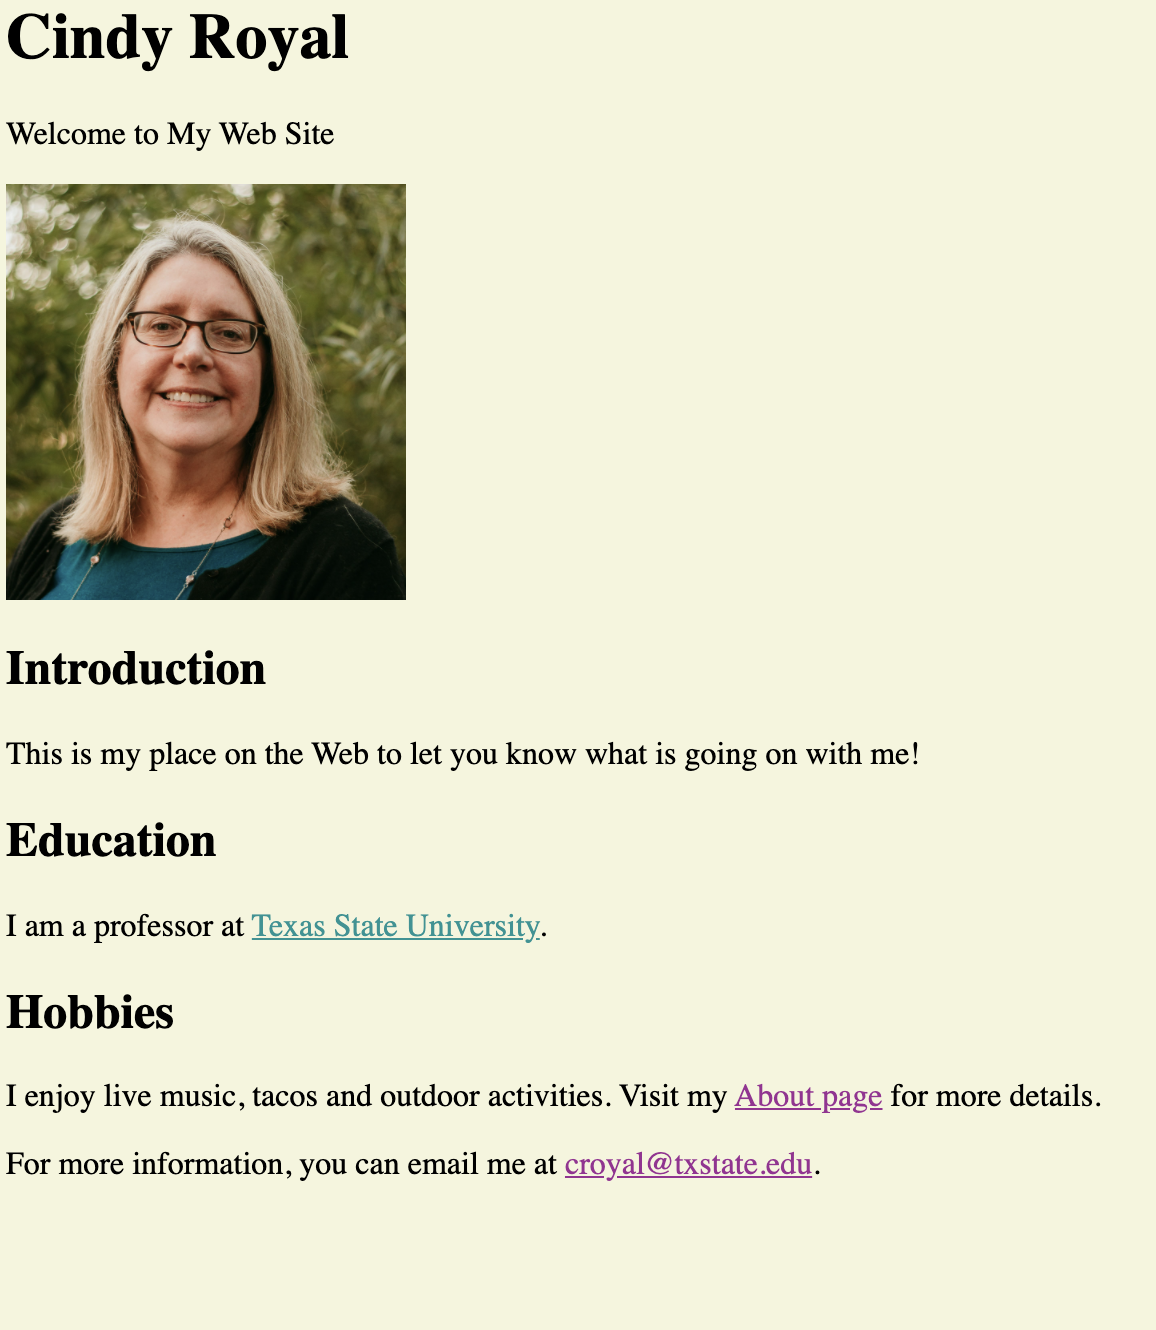
Your page should now have a link on it. You should be able to click on the external link. Does it open in a new window? For the internal link, you will have to make a page with that name to be able to see it working. Change the colors in the body element to see how it affects the links.
Lists and Tables
Lists
Lists provide ways to format collections of content. You can use an ordered list (numbered) or an unordered list (bulleted).
Ordered List- a numeric list; requires using nested tagsAn ordered list will appear like this in browser:
- University of North Carolina at Chapel Hill
- University of Richmond
- University of Texas at Austin
Unordered List- a bulleted list
UseAn unordered list will appear like this in browser:
- University of North Carolina at Chapel Hill
- University of Richmond
- University of Texas at Austin
List Attributes:
- TYPE - for unordered lists, numbers are the default, but you can use an A for Capital letters, a for lower case, I for Uppercase Roman Numerals and i for lowercase Roman.
- START - insert the start value; 1 is default.
- Use the attribute TYPE to set bullet shape (disc, circle, square) for unordered lists
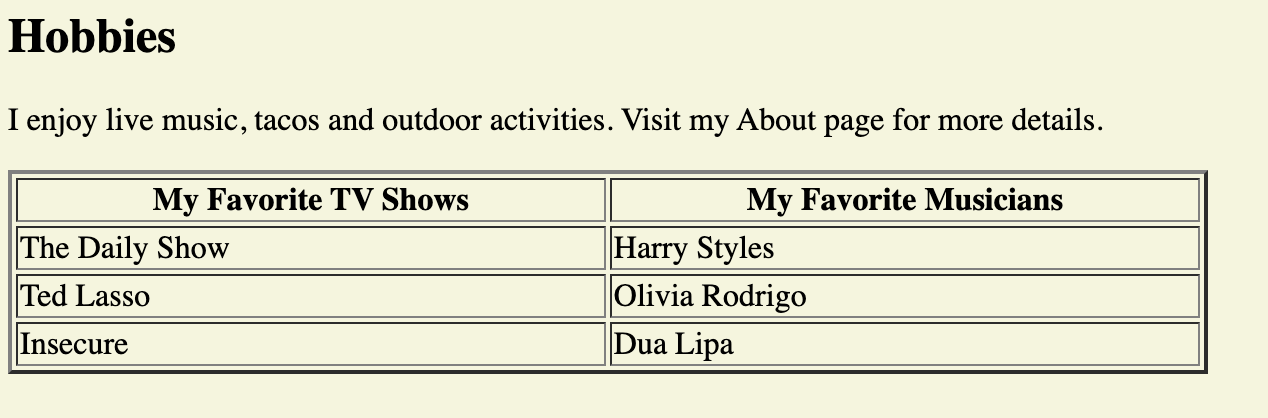
Code Sample - Lists
Add an ordered or unordered list to the html page you have been working on. Refer to the code format above.
Below is an example of an unordered list.

Tables
Tables provide formatting in rows and columns. Use tables for data, not layout. In the early days of Web design, designers used the table feature to establish a grid for layout. But now, with the use of CSS, we have much more powerful, consistent and responsive ways to create a Web page layout.
Like lists, tables also use nested elements.Table attributes
- border - sets size of border
- bordercolor-for a solid border; bordercolorright and bordercolorleft-for a shaded border
- width-sets amount of space it takes up on page, can use pixels for a fixed width or % for a width as a percent of screen size.
- align-use align="center" to center table.
Code Sample - Tables
Add a table to the html page have been working on. Notice how the table elements work together to create rows and columns. Additional rows and columns of content to the table on your page. If any of your elements aren't displaying properly in the file you have created, troubleshoot them by checking each element carefully, making sure you used proper spelling, used angle brackets and quotation marks properly and closed any tag you opened.
Your table should look something like this.
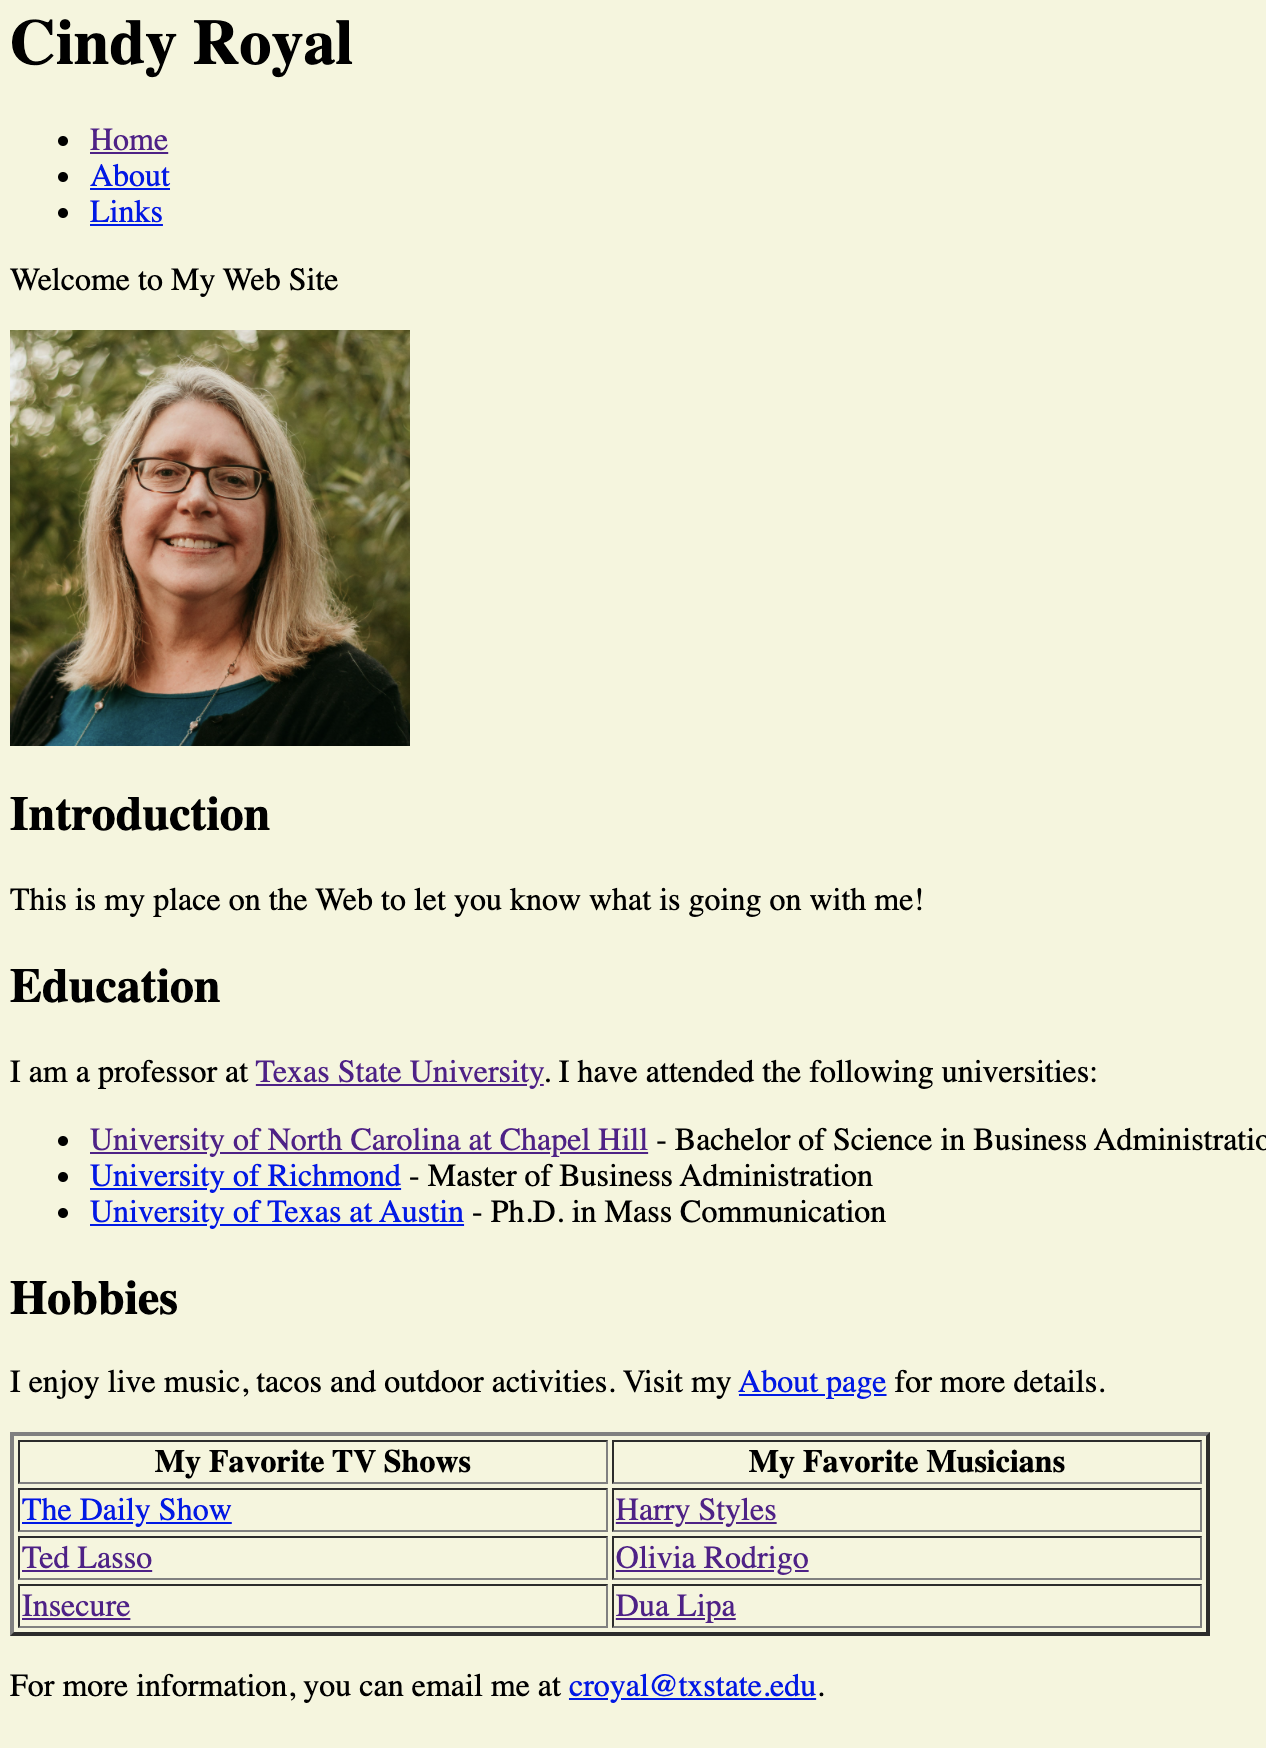
Code Sample - Navigation
Add navigation to your site using the unordered list method and make at least two additional pages, with content. Navigation should be in the same place on each page and have all the same elements.
The code above includes everything we have covered in this tutorial - Basic Elements, Image, Links, Lists, Tables and Navigation. Use this code as a basis for making your own first website. Make sure all images and links work and that your content displays properly on all pages. Test Everything!
Your page should look something like the example below.
Other Elements
Comments
Web developers will often put comments in their code. These do not affect the appearance of the site, but provide code delineation or instructions for the designer or others who may be working on the page. See the code sample to the right.
Deprecated Elements
When a tag is no longer used or supported in HTML, it is considered deprecated. So, you should avoid using them. You should pay attention to developments in HTML to know which tags are deprecated and what replaces their functionality.
Text Formatting - Early versions of HTML did not allow the author the control to specify a particular font. Font selection was at the mercy of users' preferences. Recent versions of HTML now allow the designer to specify font sizes and styles, given that the user has those fonts installed on their machine. If the user does not have the designated font, the default is shown.
The font tag is considered deprecated. Most Web designers now use CSS to control text formatting on Web pages. This allows the designer to create a style and have it apply globally to all pages on a Web site.
Another deprecated element isDOCTYPE
One final thing to always include in your pages is a DOCTYPE. This isn't an html element, but it is an important instruction to lead with on an html page, because it lets the browser know which version of HTML you are using, thus which rules should apply. A page will work without a Doctype, but it is always best to include one. For HTML5, the Doctype is simply:
Code Sample - Comments
The code above is fully commented to make it helpful to find sections of the site or for other coders who will work on it later.
FTP
You have made this wonderful site, but for now it just lives on your computer. To get it on the Web, you have to have space on a Web server. You can do this by going through a Web host and getting a domain. There are many Web hosts that all have different features and pricing models, so review a few before you purchase one. Most hosts provide both the Web hosting (server space) and domain registration, although these are separate processes. Some hosts to consider include Bluehost, Reclaim Hosting, HostGator and Dreamhost. See a comparison at PCMag.com.
You might also have server space via other means, a school or work account, so check out your options.
Once you have a way to host your files, you will need to transfer them to the Web. There are several methods, but the general process is called File Transfer Protocol (FTP). You can use an FTP client like Fetch or Cyberduck (Choose your OS platform to download). You will login with your domain name, ftp username and ftp password. You may also need to change the connection type to SFTP, depending on your host and connection. Some Web hosts, like Reclaim Hosting or Bluehost, have file management tools as part of their control panel, like the File Manager, that is a ftp cloud platform.
On most hosts, you have to upload files to the "public_html" folder. This is the public-facing folder on your site. Anything not under the public folder will not be able to be seen by the public. Outside of public_html is a place where you can store files in the cloud to access later that do not show up on the public web.
In your FTP program, change to your public_html folder. This is where you will upload files associated with your domain. You will use the upload or "put" feature to transfer copies of your files to the server. The folder on the server should resemble the file structure you are used to seeing in the Finder on your computer. You are simply creating a copy on the server. Once the files are transferred, they can be accessed via a browser by anyone on the Web!
Cyberduck operates similarly to Fetch in that you choose Open Connection to connect to your server with your hostname, username and password. Then you double-click to select the public_html folder. Under the Actions button, choose Upload to browse your comptuter and find files to upload. Upload the html and image files to your public_html folder. See the images below.

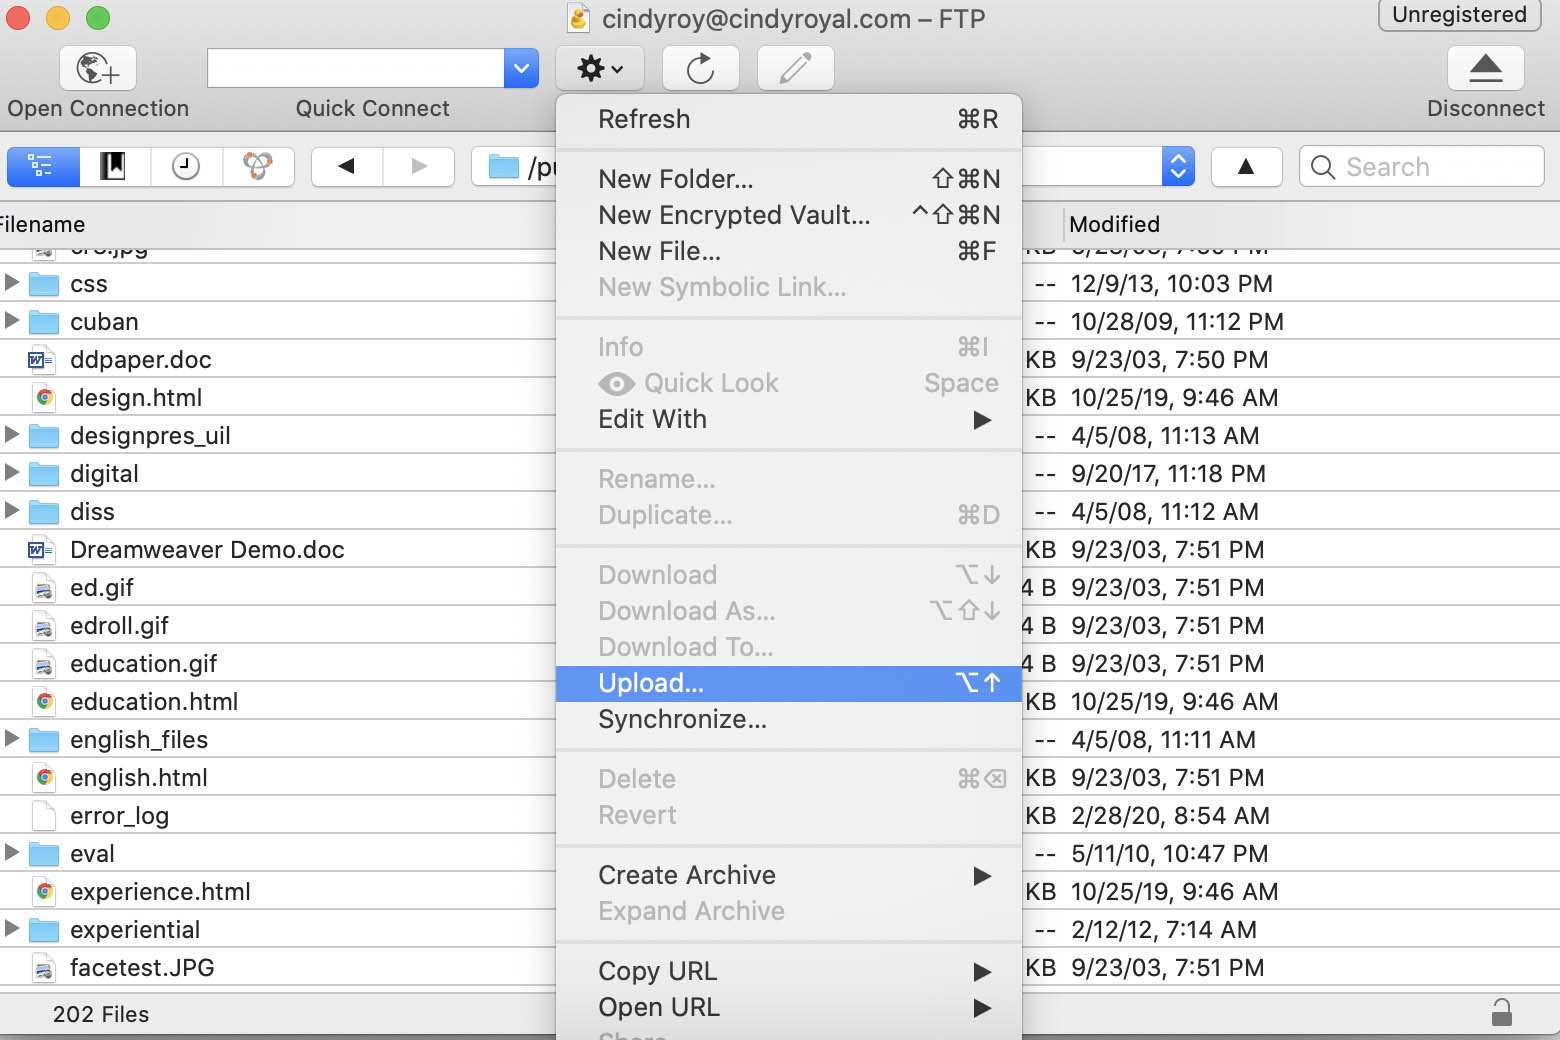
Later, you will learn about creating folders and subdomains on your site. For now, just keep your files very organized for each Web project. The location of a file matters when it is being accessed by another file, so this will assure that your links and images function properly.
Moving On
That's a pretty good introduction to HTML. You should now have an understanding of the basic elements and attributes and how to use them on a page. We'll have a few more HTML elements to add after we learn a little about about styling with CSS in the next tutorial.