
Exercise - Passing Information Using TextFields, Switches, Sliders and Picker Views
What is it?
Swift is the current language for creating iPhone applications. It works within Apple's Interactive Development Environment (IDE) XCode. It is a combination of visual and programming interfaces.
Why should I learn it?
The world is mobile. While many content applications can function on phone browsers, there are some applications, like games, social media and ecommerce, that need native functionality.
What can I do with it?
You can create the visual interface as well as add code to represent functionality of your application using Swift and XCode. Then you can test and upload to Apple's App Store.
How long will it take?
Learning application development is a different and bit more difficult than creating websites. These tutorials will take several weeks to go through to explain the basic functionality available for application development. But with time and practice, you can master the skills necessary to create functional applications. Beyond iPhone development, there is native Android development and cross-platform options like React Native to consider.
Exercise - Passing Information Using TextFields, Switches, Sliders and Picker Views
Exercise: You have had experience with all these topics. Now you will assemble them into an app with multiple view controllers and pass the values back to the initial VC (view controller). Follow these steps carefully to set up this app. If you encounter errors, take your time to try to troubleshoot. Back out your code, remove the most recent objects, check your Connections Inspector to make sure all Connections are correct.
This project will create a scene each to demonstrate how to pass a value from a switch, a slider and a picker view to the main View Controller.
Basic Interface
- Start with a new project. (File, New, Project, App, make sure you choose Language: Swift & User Interface: Storyboard) Name it MultipleEx. You can choose Tests Off. Use the Library to add the elements described below
- Create an application that has three additional View Controllers. Drag them to the Storyboard and create and attach View Controllers for each one (File, New, File, Cocoa Touch Class). You can name them SwitchViewController, SliderViewController and PickerViewController. Make sure the subclass is UIViewController. You connect these to the views in the Storyboard by clicking the View Controller button and selecting the correct controller in the Identity Inspector (icon looks like a tiny web page). Make sure the main storyboard is the Initial View Controller.
- Create a label that indicates the name of each scene as Name, Switch, Slider and Picker, just to indicate those scenes near the top. Make them bold with the Attribute Inspector.
- In the initial View Controller, create buttons to go to the Switch, Slider and PIcker VCs. Include them on the top right, but far down enough so they won’t be covered by the Navigation Controller when you add it. You can connect these with a segue (ctrl drag to the scene from each button, choose Show).
- In the initial View Controller, Embed a Navigation Controller (Editor, Embed In, Navigation Controller). This will provide the navigation for a Back button. Make sure you are in the main storyboard and that it is set to Initial View Controller before you Embed the Navigation Controller.
- On the initial View Controller, include a TextField that asks for Name. Add a Button to the storyboard below the Text Field to submit the name. Have it with text “Submit”.
- Also include labels as Outlets for Name, Switch, Slider and Picker in the initial view controller.
- In the Switch View Controller, include Switch from the Library. In the Identity Inspector, have it initially set to “Off.”
- Include a label that on the Switch scene that will be used to show you the value of the Switch as it changes.
- In the Slider View Controller, include a Slider from the Library. In the Identity Inspector, use 1-5, having it start at 1.
- Include a label on the Slider View Controller that will be used to show you the value of the Slider as it changes.
- In the Picker View Controller, include Picker from the Library.
- Include a label that on the Picker scene that will be used to show you the value of the Switch as it changes.
Extra: If you want to get fancy, you can add the Button Bar Item, change the image for the item and make the menu show and hide, as we did in the Adding Scenes tutorial.
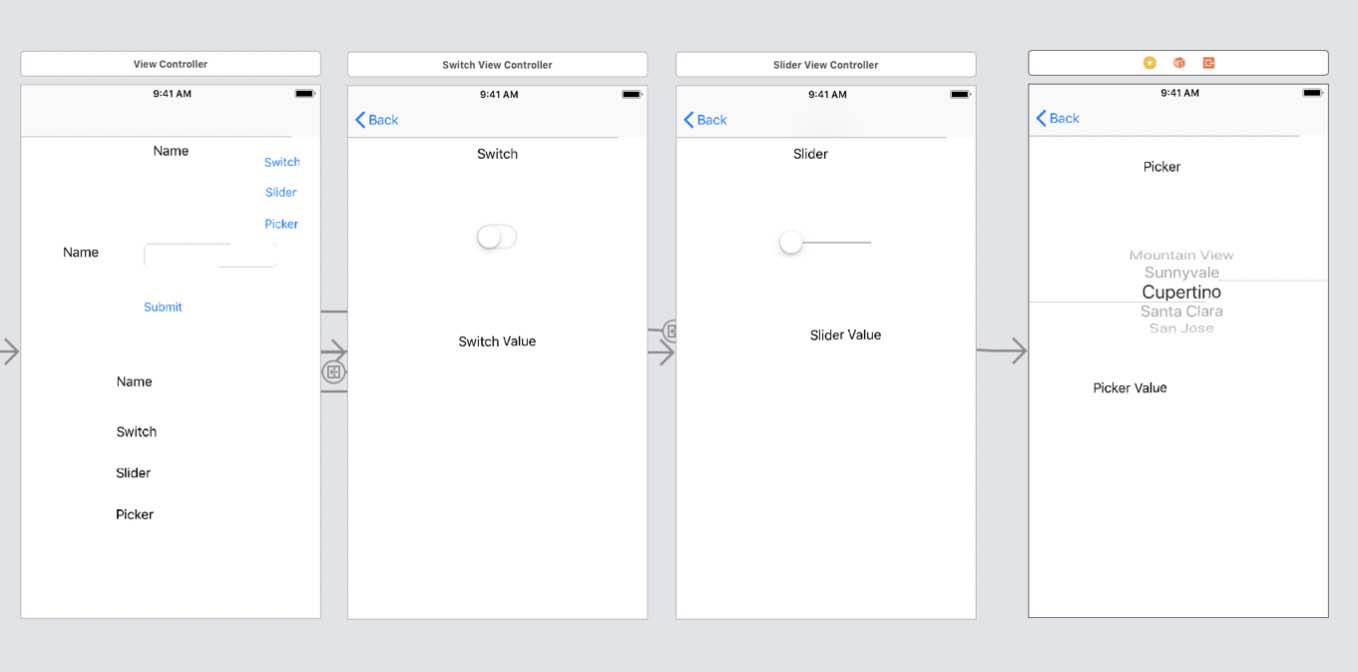
See image below for general layout of each View in the Storyboard. But feel free to design and align each View the way you want.
At this point, you can test that your app navigates properly, back and forth between each scene. We will add the functionality next.
Initial View Controller
- See the code in the associated boxes for each step. Initialize the Global class and define the global variable in the main VC below the import UIKIt statement (but above the class ViewController declaration). This includes the variables we will be passing across view controllers.
- In the main view controller code, connect each of the four labels to the code as Outlets named theName, theSwitch, theSlider and thePicker respectively (ctrl drag). Make sure to drag the label width to a size that will be able to show the result.
- Connect the TextField to the code as an Outlet named myName.
- Connect the Submit button to the code as an Action named myButton and include the code from the box in it.
Remember that we used resignFirstResponder() to make the keyboard go away after submitting the text field. Test the app and fill out the TextField and Submit. You should see the value changing in the Name label below.
Switch View Controller
- Make sure your SwitchViewController is connected in the Storyboard (ViewController button at top of scene, make sure SwitchViewController is selected in the Identity Inspector). Use option-click to open the SwitchViewController code.
- Connect the label in that view controller to the code as an Outlet named switchVal. This will show you the value of your switch as you test it in that view.
- Connect the Switch to the code. Make it an Action, type UISwitch (very important). Name it mySwitch. Put the code from the box in the code for that function:
- In the viewDidLoad function, include the code in the box to initialize the original state of the switch as “off,” so that every time you go back to this scene, the value of the Switch is in sync with the switch itself (which we told to start at “off”)
- Go back to the main view controller and storyboard (option-click on the view controller to open the code). Create the viewWillAppear function (see code in box). This will include what we want to appear when the user returns to the main view controller using the Back button.
You should be able to run the app and see the correct results now for Name and Switch on the initial view controller when you return to it.
Slider View Controller
- Make sure your SliderViewController is connected in the Storyboard (ViewController button at top of scene, make sure SliderViewController is selected in the Identity Inspector). Use option-click to open the SliderViewController code.
- Connect the label in that view controller to the code as an Outlet named sliderVal. This will show you the value of your slider as you test it in that view.
- Connect the Slider to the code. Make it an Action, type UISlider. Name it mySlider. Put the code from the box in the code for that function:
- Back in the main view controller add the code from the box for the Slider to the viewWillAppear function that you created above. This will update the Slider label on the main VC.
This code will get the value of the slider and put it in a global variable. The label text on the Slider scene will change to show the value.
Picker View Controller
- Make sure your PickerViewController is connected in the Storyboard (ViewController button at top of scene, make sure PickerViewController is selected in the Identity Inspector). Use option-click to open the PickerViewController code. Include the extra items in the PickerViewController class declaration to accommodate the picker view features. See the code in the box.
- Connect the label in that view controller to the code as an Outlet named pickerVal. This will show you the value of your slider as you test it in that view.
- Include the code from the box in the ViewDidLoad function of the PickerViewController to add the delegate and datasource references.
- Include an array with your Picker items in the code (see the code in the box). Feel free to name the items what you want.
- Initialize a "selection" variable as a String (see the code in the box).
- Connect the Picker to the code. Make it an Outlet, name it “picker”.
- See the code in the box. Add the four functions to the code to run your picker
- Back in the main view controller add the last line of the code to the viewWillAppear function that you created above. This will update the Picker label on the main VC.
If you see errors at this point, don’t worry. The next few steps will fix them.
Moving On
You should be able to run the app and see the correct results now for Name, Switch, Slider and Picker appear on the main storyboard after you visit the respective pages. If you have any errors, troubleshoot them, remove problem code or items and try again.
Congrats on finishing the exercise! I will provide instructions for how to submit for my students. Think about how you will use all these features in your final project!