
iPhone App Development - Passing Variables
What is it?
Swift is the current language for creating iPhone applications. It works within Apple's Interactive Development Environment (IDE) XCode. It is a combination of visual and programming interfaces.
Why should I learn it?
The world is mobile. While many content applications can function on phone browsers, there are some applications, like games, social media and ecommerce, that need native functionality.
What can I do with it?
You can create the visual interface as well as add code to represent functionality of your application using Swift and XCode. Then you can test and upload to Apple's App Store.
How long will it take?
Learning application development is a different and bit more difficult than creating websites. These tutorials will take several weeks to go through to explain the basic functionality available for application development. But with time and practice, you can master the skills necessary to create functional applications. Beyond iPhone development, there is native Android development and cross-platform options like React Native to consider.
Passing Data Forward
In order to use multiple scenes in which you will pass data, you must use global variables and multiple View Controllers.
Set up a new Single View App called Passing (File, New, Project, Single View App, make sure you choose Language: Swift & User Interface: Storyboard). Bring up the Storyboard. Add a new View Controller from the Library and place it next to the original Storyboard.
You can check on the View Controller button at the top of each storyboard to see which is the Initial View Controller in the Attributes Inspector (or look for the arrow pointing at the Initial View Controller). The first scene should be the Initial View Controller.
Bring up the main View Controller for the first scene (option-click on the ViewController.swift file)
We need to initialize a global variable that can be accessed outside the scope of this ViewController. This goes above the ViewController class declaration, below the import UIKit statement.
To make a quick interactive, let's put a button on the first scene that increments the score by one. Drag a button to the storyboard. Then control-drag from button to the code, creating an Action with the name myButton. Put this code within the class ViewController. This will increment the score, but we will create a Outlet on another scene to display the score.
*note: the shortcut for adding a number to a variable is += . The above is the same as score = score + 1
Add a Scene
We don't see the score yet. We want to pass it to another scene. Let’s create another button to go to the next scene with a segue. Drag another button to the Storyboard and Control-drag from the button to the next storyboard and choose Show. Notice the little segue icon between the Storyboards.
Now we need a Label that can display the score that was calculated in the previous scene. Before we can connect it to the code, however, we need to create a new ViewController just for this scene. In the XCode menu, choose File, New, File and choose Cocoa Touch Class. This will allow you to use a template for your new ViewController. Name the class SecondViewController (*hint: don't start the name with a number), and make sure UIViewController is the subclass. Save it in the default project folder with the rest of your project.
We will now connect this new ViewController to the 2nd Scene. Make sure your Storyboard is showing. In the 2nd Scene, click the ViewController button at the top. Then in the Identity Inspector (looks like a tiny webpage), in the Class, choose the new ViewController you just created.
Drag a Label onto this new scene. Connect it to the code as an Outlet and call it myScore. Put this within the ViewController. Make sure you have SecondViewController file open.
To update the label, it needs to be in a function. Let's use the viewDidLoad function in this new ViewController that already exists, so that it will update the myScore text as soon as we enter that scene.
Run the app. Push the button in the first scene a few times. Then click the segue button to go to the next scene. You should see the incremented score on the second scene.
Add Another Scene
On your own, add an additional scene, add a new ViewController file named ThirdViewController. Add a button in SecondViewController that adds 5 to the score that gets updated in your new View Controller.
This technique, using scenes and a global variable is a simple way to pass values forward across scenes. But it does not work for passing variables backwards.
Passing Variables Backward
When you set up an app that goes backwards and forwards in Scenes, you might need to also pass data back to an earlier ViewController. Maybe you want to provide some options, but the user always returns to the main ViewController with a Back button.
But in the examples above, with the global variable, returning to the initial ViewController would re-initialize the global variables. To handle this, we will create a class to initialize the variables and then hold the values in an instance of that class. This method can be used for forward as well as backwards passing of the variables.
Create a back button for each of the scenes above. Instead of progressing forward, we will go back to the initial ViewController after each scene. In the initial ViewController, create buttons to go to each of your other ViewControllers using a simple segue. In the ThirdVC, create a button that adds 10 to the score.
Instead of calculating the score on each ViewController, we will just have a score on the initial VC. You can remove the labels on the other scenes and any code that refers to them. At this point, test to make sure all the segues are working properly. If you have an error, check to remove any unwanted code or connections and use Product, Clean Build Folder, if necessary.
In the initial VC, put the global variable in a class (instead of on its own) and then create an instance of that class. Do this above the ViewController declaration, after the import UIKit statement. See the code to the right.
Now, any time you want to reference “score”, it will be as global.score. This way, the initialization of score is protected in the class and the state of the variable is stored in the global instance of the Global class. You can name these anything you want, as long as you refer to them properly.
So, in each VC, when we click the button for the scoring, the code will be as displayed on the right, depending on which button/scene you are on.
And when you update the score in the label on the initial VC, reference the global score in the viewDidLoad function.
Make these changes and run the project. Does it update the score in the initial VC properly? You may want to also include the code to update the text on the myScore label on the button that adds one on the original scene, so you can watch it update as you press that button, in addition to updating on viewDidLoad
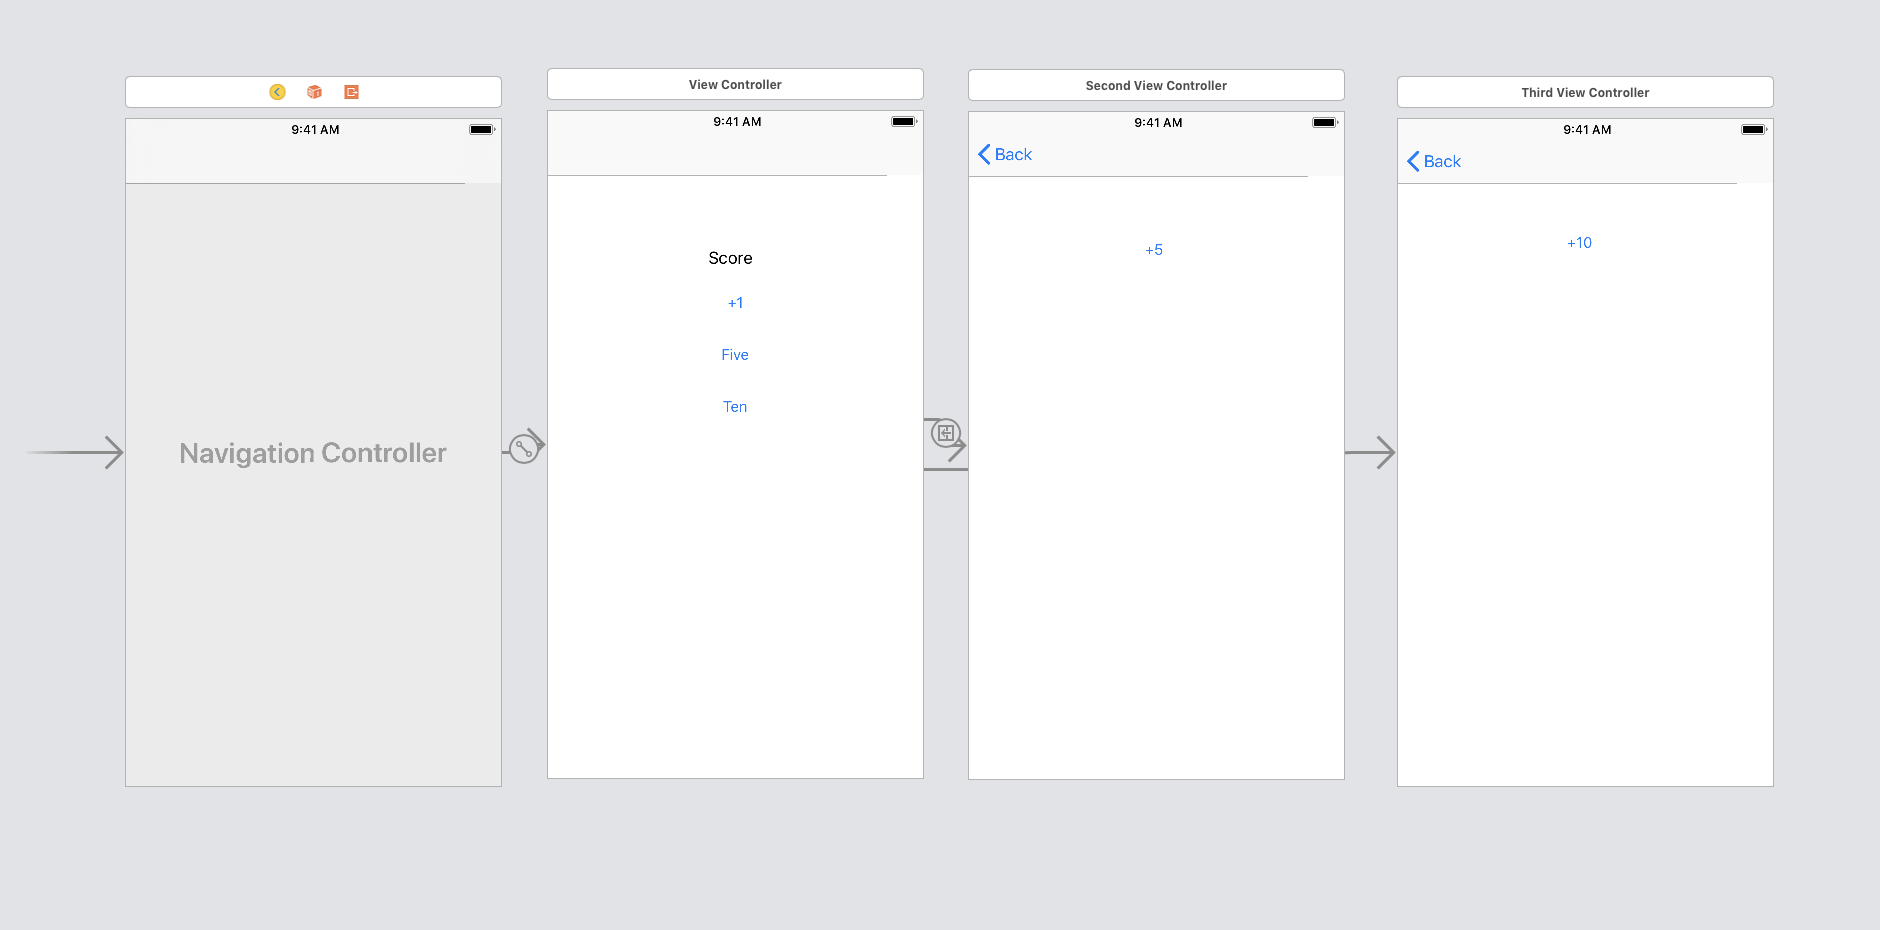
Use Navigation Controller
You can also use a Navigation Controller for your Back button, but instead of using viewDidLoad, create a viewWillAppear function to update the myScore label's text. The Navigation Controller has a different function and does not execute a viewDidLoad when returning to the scene.
The Storyboard should look like the image below and function with the buttons in each scene passing data back to the initial View Controller. Note that the Navigation Controller scene is an invisible scene that adds the Navigation Controller functionality. The user does not see that scene.
This is just a simple demonstration of passing information to other scenes. It demonstrates different types of events that can be used with functions (viewDidLoad, viewWillAppear). You can pass any kind of data that is stored in a variable, so consider how you will use textfields, switches, sliders and (later) picker views to generate data to be used in your application. Be creative in how you apply these techniques to your projects!
Moving On
Take your time with these techniques. They will help you achieve more professional and responsive designs! Next, we'll move into additional app functionality.